AWS ec2 인스턴스 생성


스토리지 설정에서 기본 설정인 8GB->최대 용량 30GB로 바꾼 것 말고는 모든 설정 default
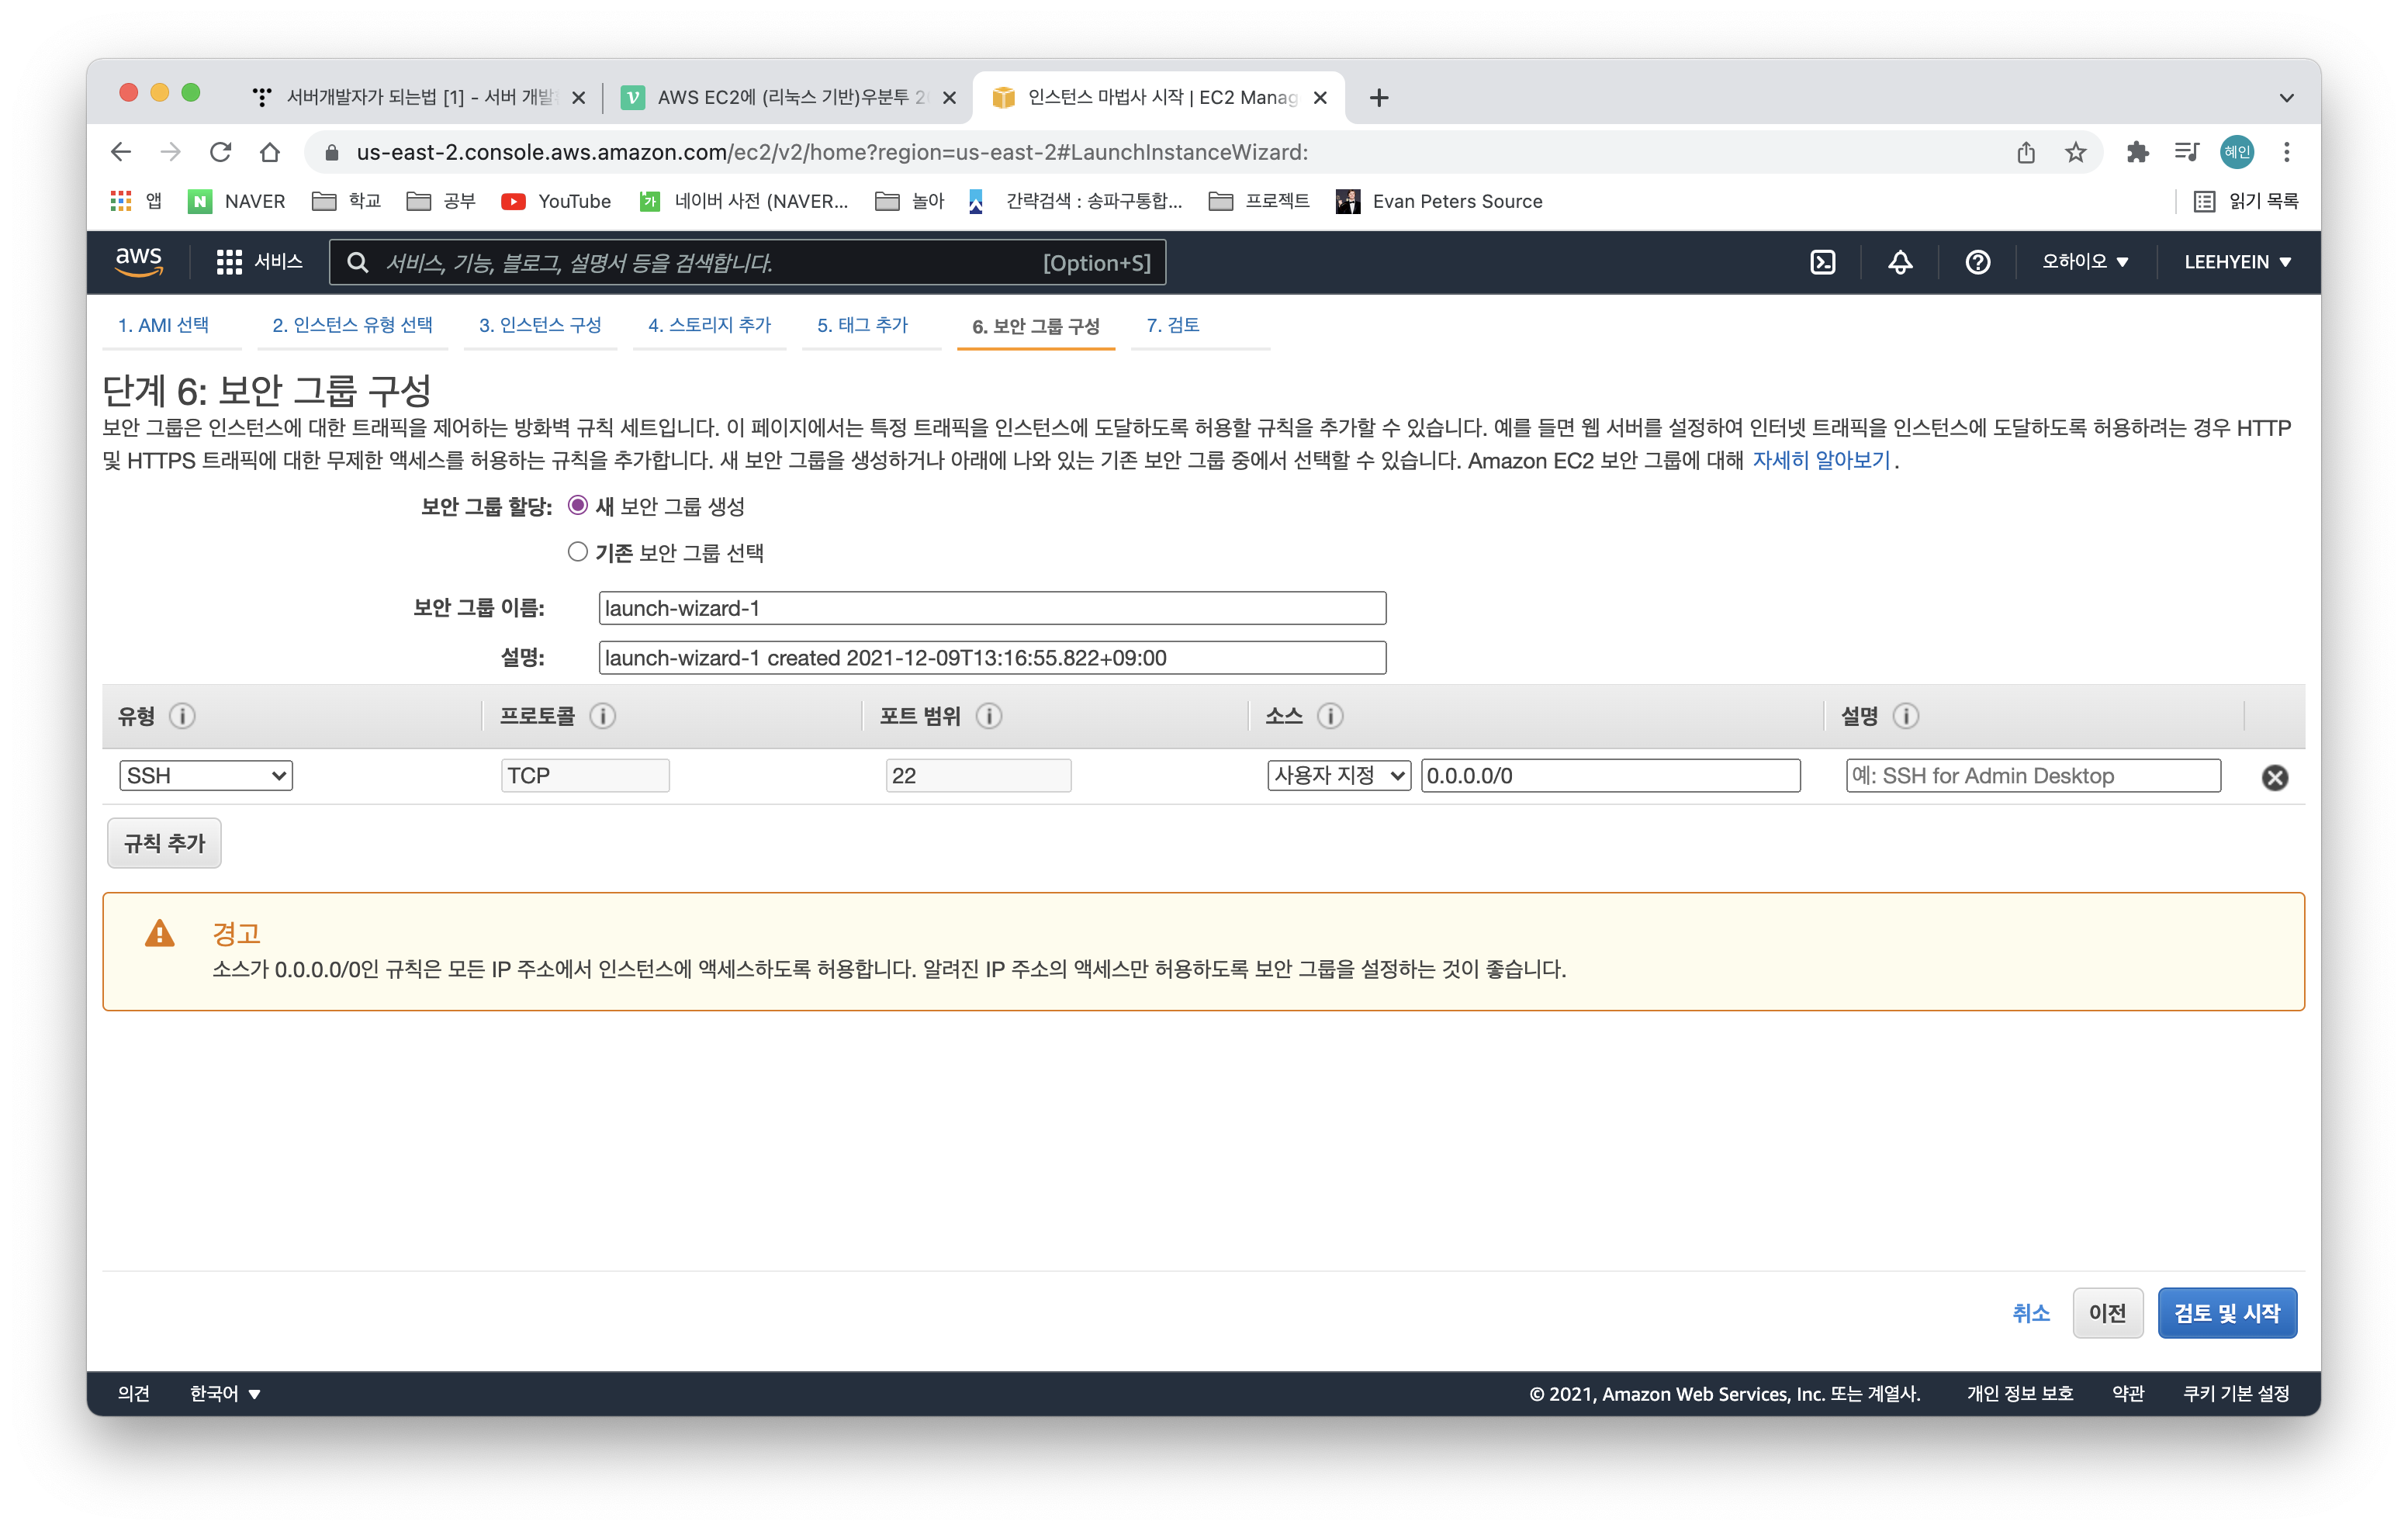
나중에 nginx 웹 서버 설치할 때 해당 설정 변경 예정
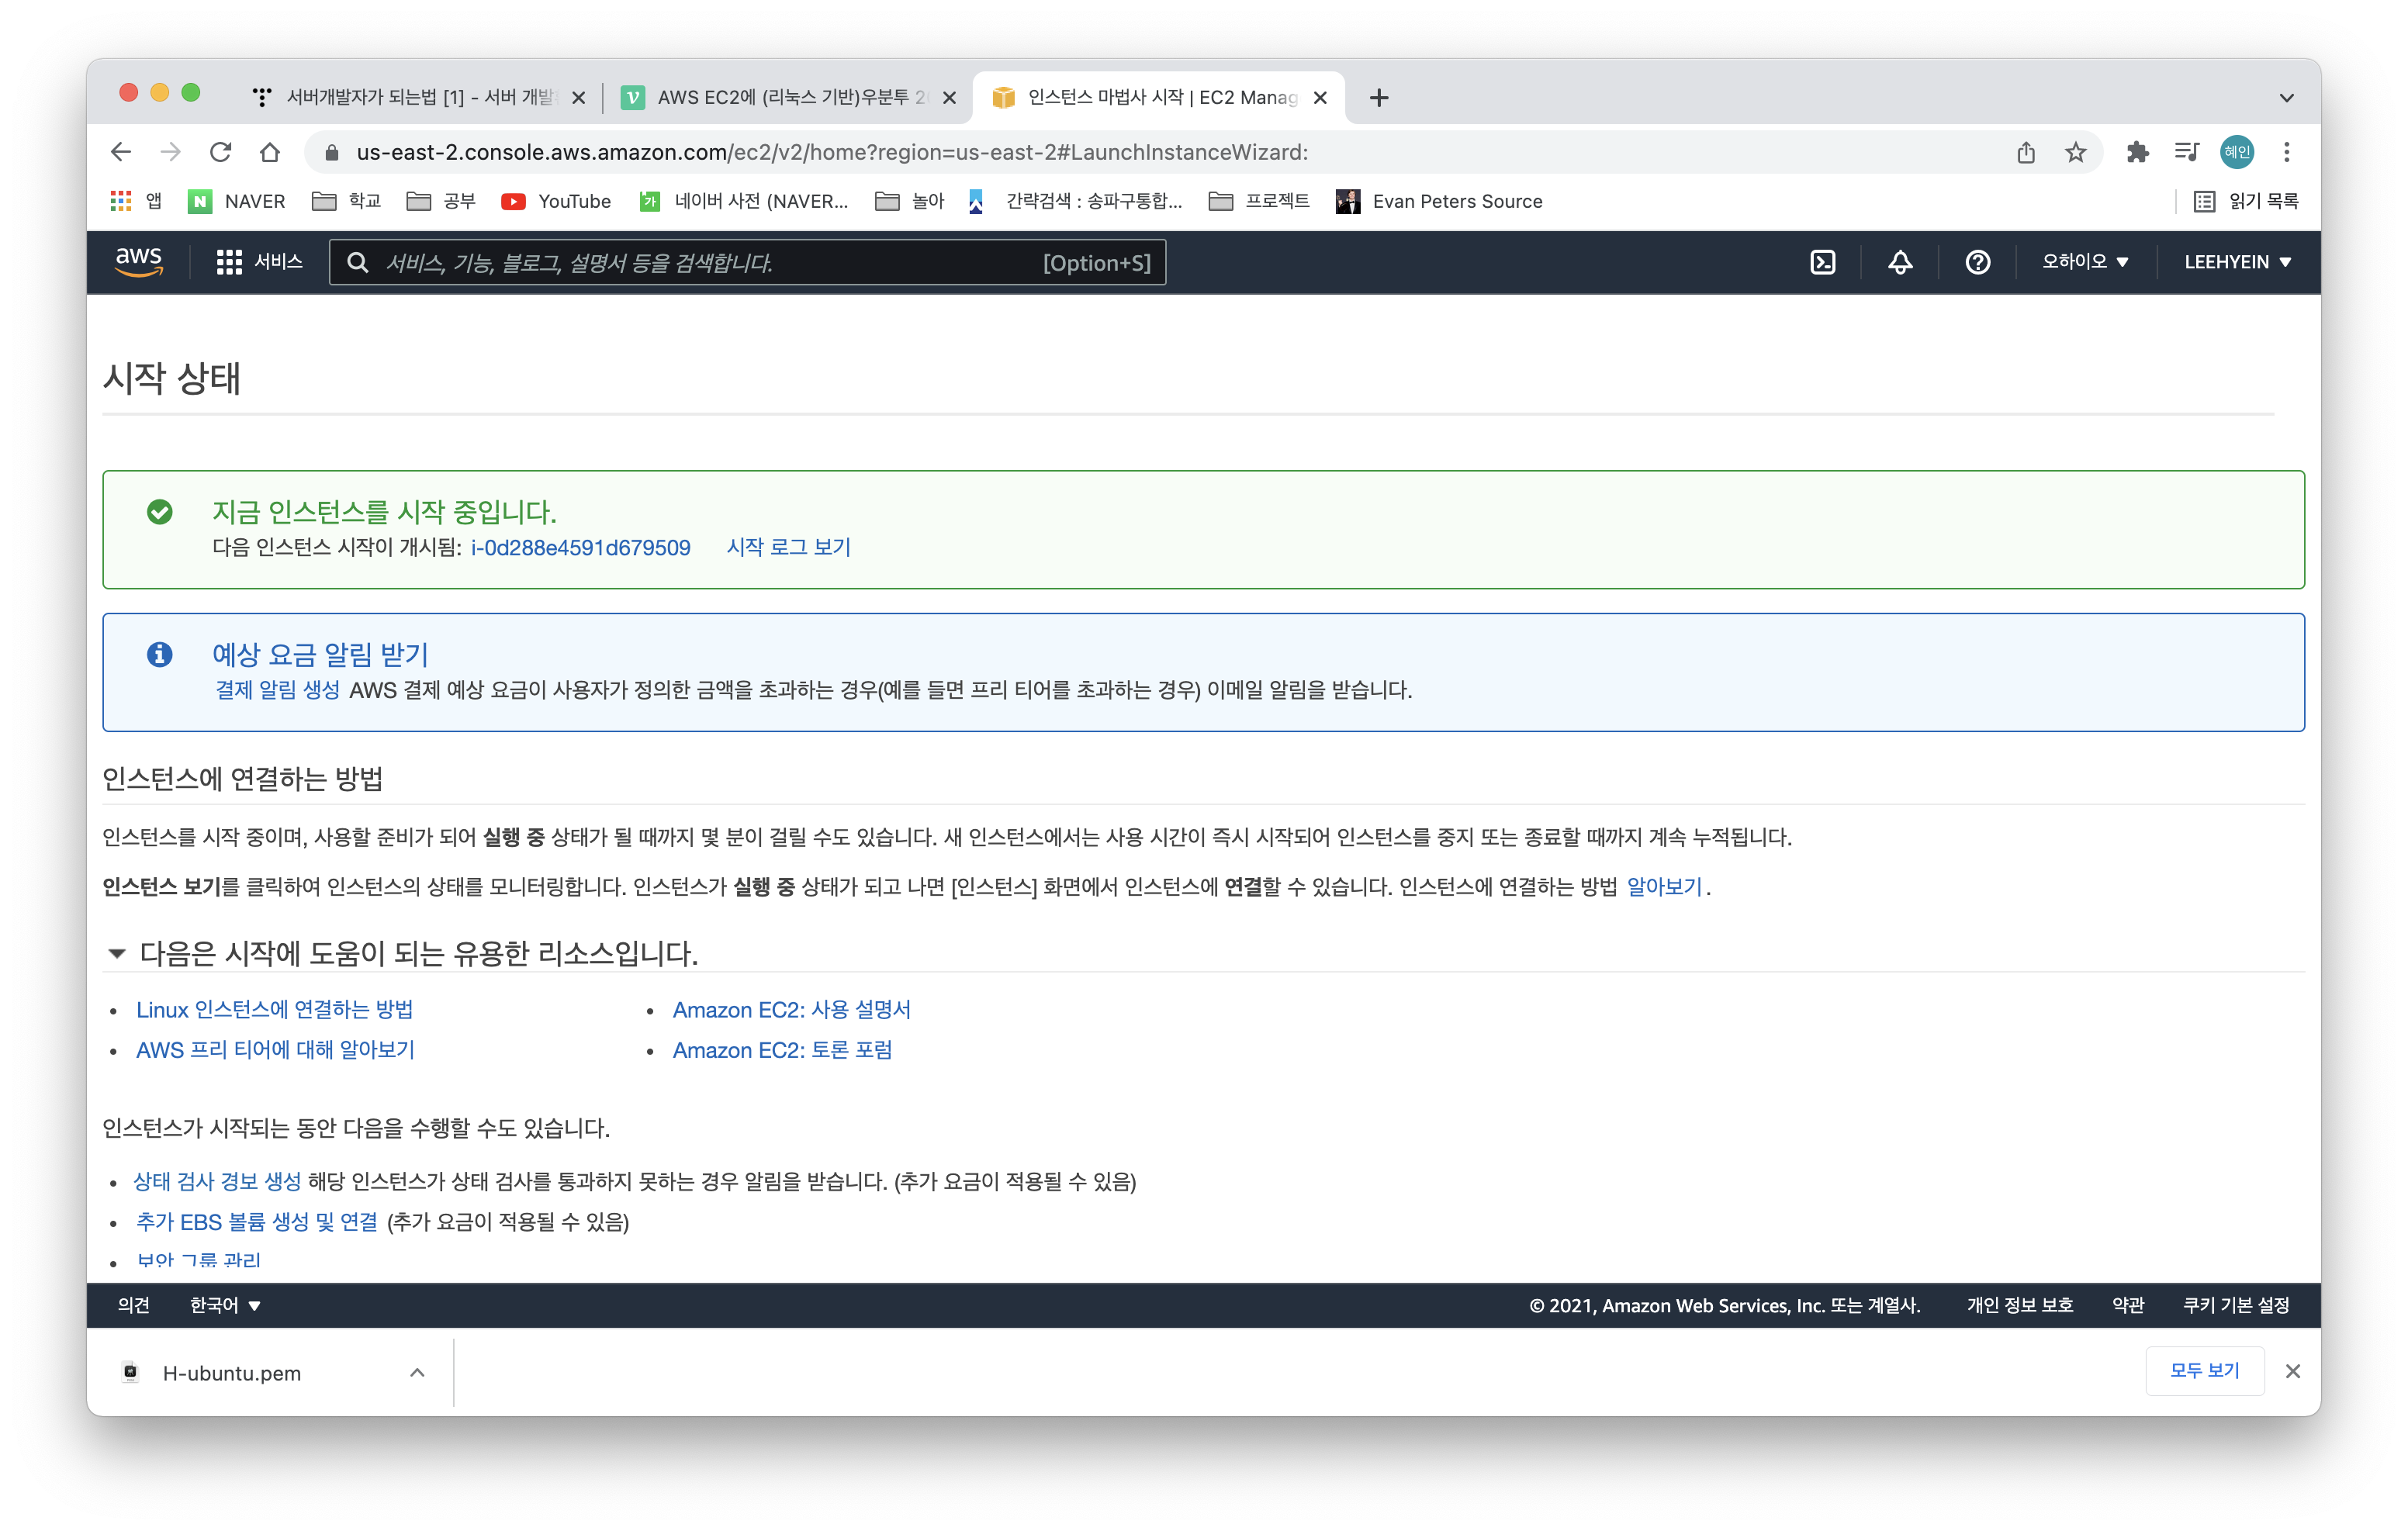
첫 인스턴스 생성이므로 새로운 키 페어 생성 및 다운로드
생성한 키 페어를 안전한 곳으로 이동시키고 chmod 400으로 권한 부여
$ mkdir ~/.ssh
$ mv /Users/leehyein/Downloads/H-ubuntu.pem ~/.ssh/
$ chmod 400 ~/.ssh/H-ubuntu.pem
AWS EC2 서버에 원격으로 접속해보자
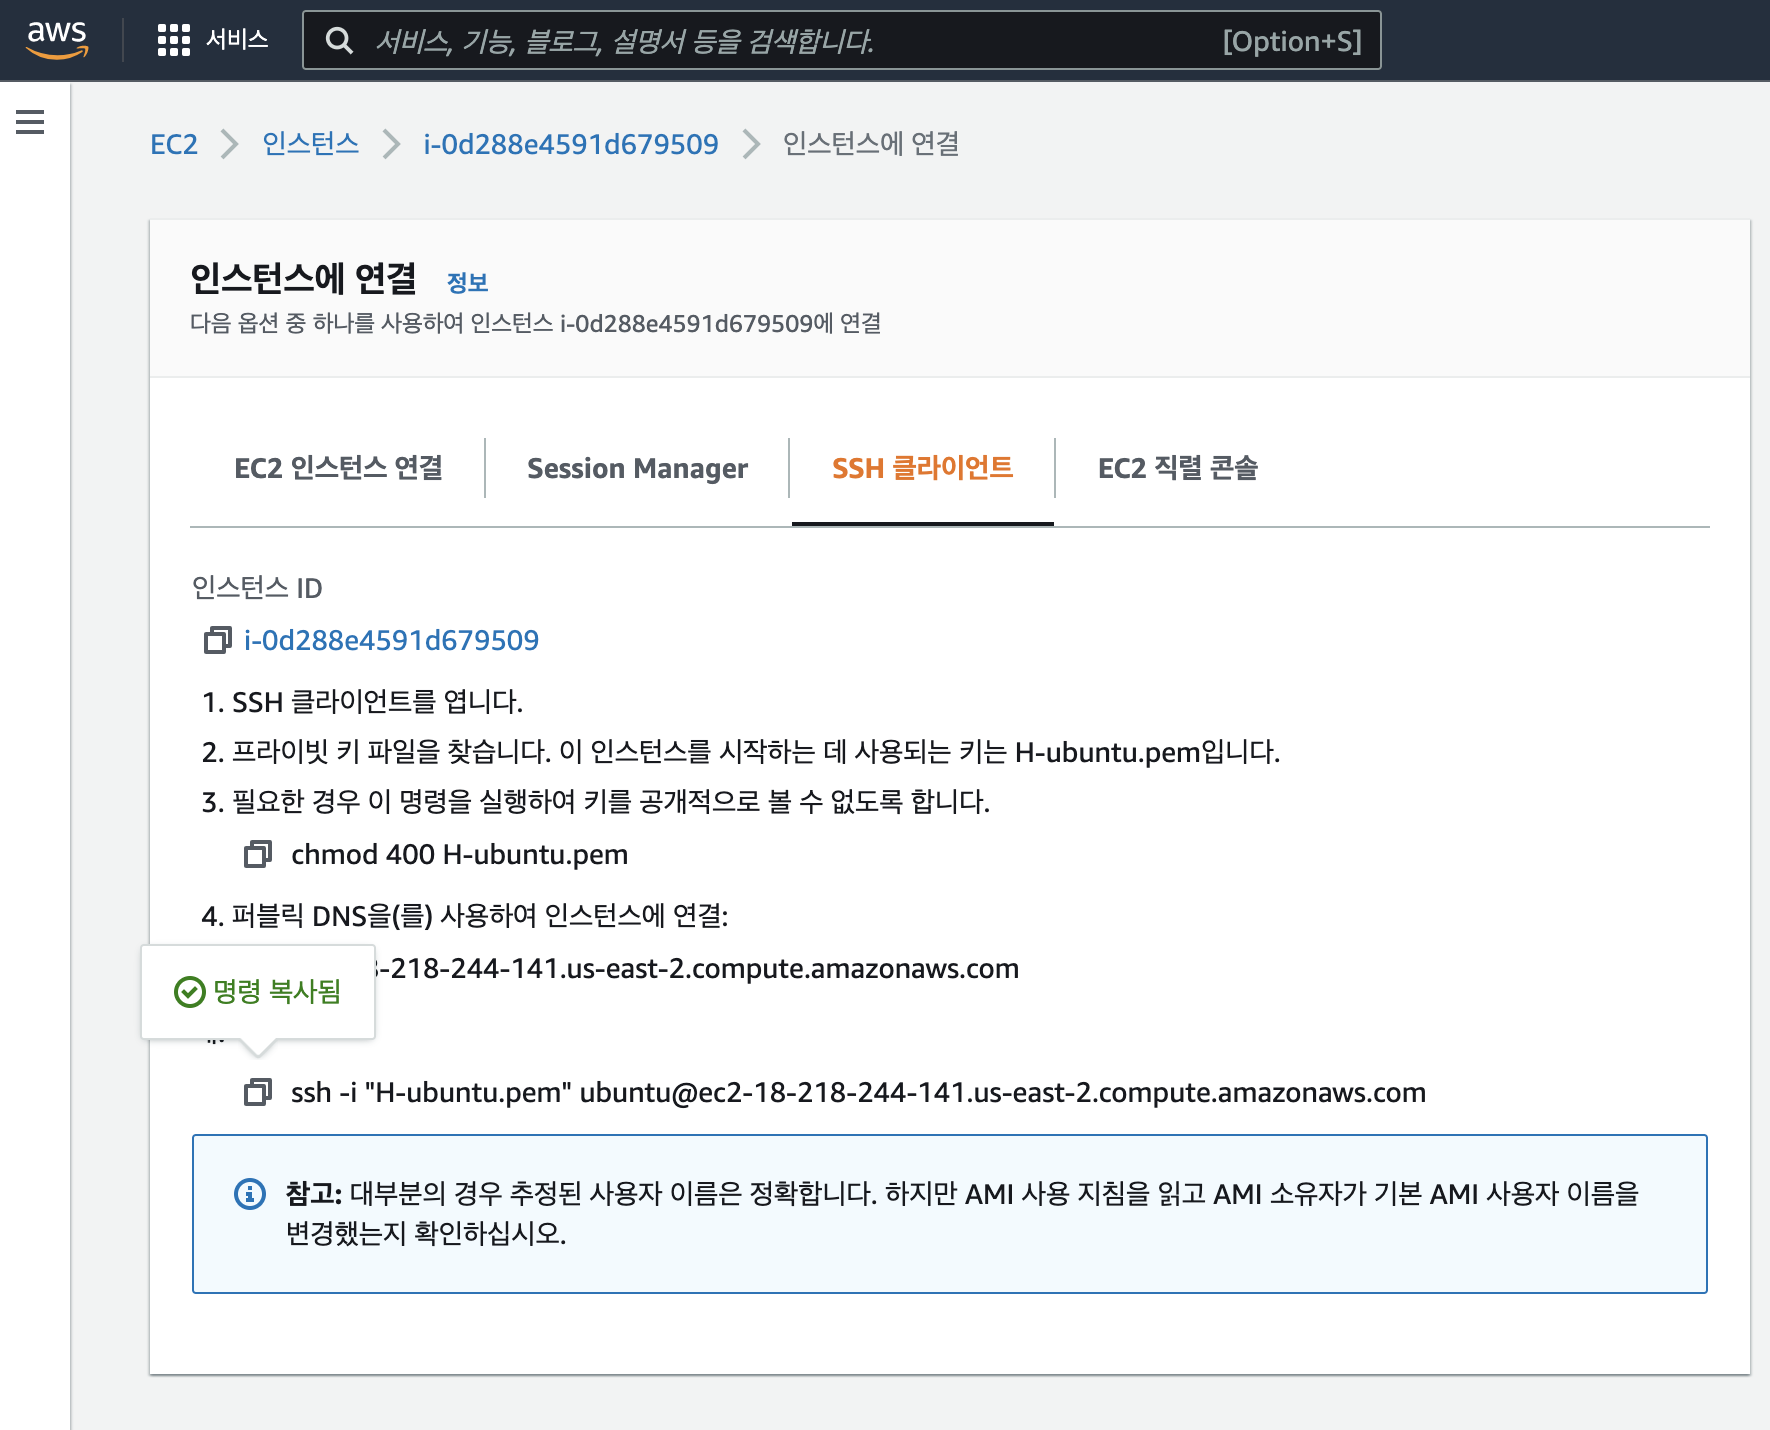
$ ssh -i "H-ubuntu.pem" ubuntu@ec2-18-218-244-141.us-east-2.compute.amazonaws.comThe authenticity of host 'ec2-18-218-244-141.us-east-2.compute.amazonaws.com (18.218.244.141)' can't be established.
ED25519 key fingerprint is SHA256:w/+1esy2qWfk4/a4fDNBqutG0r+ME7zDPQf2rZ8uoTE.
This key is not known by any other names
Are you sure you want to continue connecting (yes/no/[fingerprint])? yesyes 입력하면
Warning: Permanently added 'ec2-18-218-244-141.us-east-2.compute.amazonaws.com' (ED25519) to the list of known hosts.
Welcome to Ubuntu 20.04.3 LTS (GNU/Linux 5.11.0-1020-aws x86_64)

 * Documentation:  https://help.ubuntu.com
 * Management:     https://landscape.canonical.com
 * Support:        https://ubuntu.com/advantage

  System information as of Thu Dec  9 04:27:53 UTC 2021

  System load:  0.0               Processes:             99
  Usage of /:   4.8% of 29.02GB   Users logged in:       0
  Memory usage: 20%               IPv4 address for eth0: 172.31.46.240
  Swap usage:   0%

1 update can be applied immediately.
To see these additional updates run: apt list --upgradable


The list of available updates is more than a week old.
To check for new updates run: sudo apt update


The programs included with the Ubuntu system are free software;
the exact distribution terms for each program are described in the
individual files in /usr/share/doc/*/copyright.

Ubuntu comes with ABSOLUTELY NO WARRANTY, to the extent permitted by
applicable law.

To run a command as administrator (user "root"), use "sudo <command>".
See "man sudo_root" for details.

ubuntu@ip-172-31-46-240:~$
접속 성공
나중에 필요하면 참고할 짧은 ssh 명령문으로 서버 접속하기 https://nerogarret.tistory.com/10
AWS EC2 기본 세팅
$ sudo apt-get update
$ sudo apt-get dist-upgrade
$ sudo apt-get install python3-pip
참고)
AWS EC2에 (리눅스 기반)우분투 20.04LTS 인스턴스 생성하기
Django 서비스 AWS로 배포하기 - [1] 프로젝트 준비와 AWS 서버 대여
서버개발자가 되는법 [1] - 서버 개발환경 셋팅, AWS EC2만들고 Django 프로젝트 실행해보기
Django 프로젝트 생성
$ mkdir mysite
$ cd mysite
$ python -m venv myvenv
$ source myvenv/bin/activate
$ pip install --upgrade pip
$ pip install django==3.2.9
장고 프로젝트의 기본 파일들을 담고 있는 폴더명을 config로 하기 위해 아래처럼
$ mkdir tlog
$ cd tlog
$ django-admin startproject config .
현재 디렉토리 구조


-configuration_root 이름 변경하면 의존하는 코드 변경 필수
-apps/templates/static 폴더 생성하면서 settings.py 변경
-각 앱 폴더의 static 폴더 안에서도 앱 이름으로 다시 폴더를 만들어줄 것을 권장
참고)
[Django] 프로젝트 구조 설정 (앱, 템플릿, Static 파일 등)
Django 프로젝트 github에 업로드하기

mysite 폴더에서 터미널 열기
$ echo "# TLOG_BE" >> README.md
$ git init
$ git add .
$ git commit -m "first commit"
$ git remote add origin git@github.com:LEEHYEIN-098/TLOG_BE.git
$ git push -u origin main- authentication 오류 - 계정 패스워드를 이용한 인증 방식 대신 personal access token 사용해야 함
remote: Support for password authentication was removed on August 13, 2021. Please use a personal access token instead.
remote: Please see https://github.blog/2020-12-15-token-authentication-requirements-for-git-operations/ for more information.
fatal: Authentication failed for 'https://github.com/LEEHYEIN-098/TLOG_BE.git/'
- Github) settings - Developer settings - Personal access tokens에서 토큰 생성
git push하고 password 입력란에 생성된 토큰 입력
- github에 올린 가상환경 폴더 삭제 - 로컬에서는 유지해야 하기 때문에 --cached 옵션 필수
$ git rm --cached -r myvenv
$ git commit -m "Delete venv"
$ git push -u origin main
- git push의 -u 옵션: 최초에 한 번 저장소명과 브랜치명을 설정하면 이후로는 모든 인자 생략하고 git push만 입력 가능
AWS EC2 서버에서 git clone 하기
ssh 명령어로 서버 접속
~$ sudo chown -R ubuntu:ubuntu /srv/
~$ cd /
/$ ls -al
total 72
drwxr-xr-x  19 root   root    4096 Dec 10 01:47 .
drwxr-xr-x  19 root   root    4096 Dec 10 01:47 ..
lrwxrwxrwx   1 root   root       7 Oct 21 23:23 bin -> usr/bin
drwxr-xr-x   3 root   root    4096 Dec  9 04:58 boot
drwxr-xr-x  17 root   root    3200 Dec 10 01:48 dev
drwxr-xr-x  94 root   root    4096 Dec  9 05:01 etc
drwxr-xr-x   3 root   root    4096 Dec  9 04:19 home
lrwxrwxrwx   1 root   root       7 Oct 21 23:23 lib -> usr/lib
lrwxrwxrwx   1 root   root       9 Oct 21 23:23 lib32 -> usr/lib32
lrwxrwxrwx   1 root   root       9 Oct 21 23:23 lib64 -> usr/lib64
lrwxrwxrwx   1 root   root      10 Oct 21 23:23 libx32 -> usr/libx32
drwx------   2 root   root   16384 Oct 21 23:27 lost+found
drwxr-xr-x   2 root   root    4096 Oct 21 23:24 media
drwxr-xr-x   2 root   root    4096 Oct 21 23:24 mnt
drwxr-xr-x   2 root   root    4096 Oct 21 23:24 opt
dr-xr-xr-x 167 root   root       0 Dec 10 01:47 proc
drwx------   4 root   root    4096 Dec  9 04:19 root
drwxr-xr-x  24 root   root     800 Dec 10 01:56 run
lrwxrwxrwx   1 root   root       8 Oct 21 23:23 sbin -> usr/sbin
drwxr-xr-x   8 root   root    4096 Oct 21 23:29 snap
drwxr-xr-x   2 ubuntu ubuntu  4096 Oct 21 23:24 srv
dr-xr-xr-x  13 root   root       0 Dec 10 01:47 sys
drwxrwxrwt  11 root   root    4096 Dec 10 02:19 tmp
drwxr-xr-x  15 root   root    4096 Oct 21 23:25 usr
drwxr-xr-x  13 root   root    4096 Oct 21 23:27 var
$ git clone https://github.com/LEEHYEIN-098/TLOG_BE.gitusername과 password 입력하면 git clone 완료
서버에서 runserver 돌려보기
패키지 동기화하기 위해 로컬 가상환경에서 아래 입력
$ pip freeze > requirements.txtgit에 push하고 서버에서는 git pull
서버에서
$ pip install -r requirements.txt ERROR: Command errored out with exit status 1:
command: /home/ubuntu/myvenv/bin/python3 -u -c 'import sys, setuptools, tokenize; sys.argv[0] = '"'"'/tmp/pip-install-6c9e2gtv/netifaces/setup.py'"'"'; __file__='"'"'/tmp/pip-install-6c9e2gtv/netifaces/setup.py'"'"';f=getattr(tokenize, '"'"'open'"'"', open)(__file__);code=f.read().replace('"'"'\r\n'"'"', '"'"'\n'"'"');f.close();exec(compile(code, __file__, '"'"'exec'"'"'))' bdist_wheel -d /tmp/pip-wheel-9q1oorqe
cwd: /tmp/pip-install-6c9e2gtv/netifaces/
Complete output (6 lines):
usage: setup.py [global_opts] cmd1 [cmd1_opts] [cmd2 [cmd2_opts] ...]
or: setup.py --help [cmd1 cmd2 ...]
or: setup.py --help-commands
or: setup.py cmd --help
error: invalid command 'bdist_wheel'
----------------------------------------
ERROR: Failed building wheel for netifaces(오류 떴는데 나중에 필요할까봐 메모)
이전에 깃헙에 프로젝트 레포지토리를 잘못 올려서.. 재업로드
로컬
$ git remove --cached -r tlog
$ git commit -m "Delete tlog"
$ git push
$ git add tlog
$ git commit -m "Add tlog project repository"
$ git push
서버
(..폴더 안 지우고 git pull받아서 reset함)
$ git reset --hard ORIG_HEAD
$ rm -r tlog
$ git pull
(myvenv) ubuntu@ip-172-31-46-240:/srv/TLOG_BE/tlog$ python3 manage.py runserver 0:8080
Watching for file changes with StatReloader
Performing system checks...

System check identified no issues (0 silenced).

You have 18 unapplied migration(s). Your project may not work properly until you apply the migrations for app(s): admin, auth, contenttypes, sessions.
Run 'python manage.py migrate' to apply them.
migrate까지 해주면
(myvenv) ubuntu@ip-172-31-46-240:/srv/TLOG_BE/tlog$ python3 manage.py runserver 0:8080
Watching for file changes with StatReloader
Performing system checks...

System check identified no issues (0 silenced).
December 10, 2021 - 04:56:25
Django version 3.2.9, using settings 'config.settings'
Starting development server at http://0:8080/
Quit the server with CONTROL-C.
AWS EC2에서 8080 포트 열어주고

해당 인스턴스 DNS 주소 뒤에 8080포트번호 붙여서

접속 성공
'_공부하는 > python' 카테고리의 다른 글
| (AWS) Django 프로젝트 AWS로 배포하기 -3 (0) | 2021.12.12 |
|---|---|
| (AWS) Django 프로젝트 AWS로 배포하기 -2 (0) | 2021.12.11 |
| Django RESTful api 서버 만들기 -2 주소록 기능 (0) | 2021.12.05 |
| django rest framework 테스트 (0) | 2021.12.04 |
| Django RESTful api 서버 만들기 (0) | 2021.12.02 |